Version: 2.01.00 - Last Update: Monday, May 05, 2008, 21:18:00


This thread is all about how to get VFP’s syntax coloured code to an HTML-formatted Blog like this is.
Intro
Today, before starting implementing, we have to look at some oddities and traps we need to work around. One of the bigger ones, I've called VFP's clipboard-quirk, forces us to use a COM-Server strategy. In addition to that we should think about other issues like where to paste the transformed HTML output and so on.
Working Around VFP's Clipboard Quirk
I told you in part 3 of this thread about the fact that as long as we are running our little tool in a separate VFP instance, never writing/copying to the window clipboard from there, it works fine as expected! Thus, the only thing we can do to avoid a second visible VFP instance is to implement our final version as a COM-Server. This is a design decision we have to make early enough (now!), otherwise we might run into troubles later on. In our case we do not need another special (third) data-layer. Thus, we are going to implement "only" a two-layer strategy, although we will use tables for storing configuration defaults and other persistent user selections. But this data conceptually belongs to the business layer. Finally we'll end up with an Engine- and a Workbench-layer that can be configured through another GUI-dialogue. Using a stand-alone RTF2HTML.EXE as a COM-Server is like using EXCEL from within VFP. We can create an instance of our "service" and then call it from within our (one and only visible) VFP developer instance without the need of (task-)switching away from it. Because under the hood our COM-Server is an independent VFP task with it's own independent clipboard access, we won't get any crashes we observed using the RtlMoveMemory API call.
That was yesterday...
TODAY COMES THE BEST SOLUTION BY FAR !
Today (on April, 15th, 2008), when I was working on the final version of my converter tool, I accidentally needed some kind of reverse RGB() function. Luckily I recalled a FOXTOOLS.FLL function called RGBComp(). When I opened my old FOXTOOLS.CHM file to lookup the syntax of this function I stumbled over a handful of clipboard functions! I was surprised about myself! How could I forget them? I checked them out (yep, I trapped some bugs but they were no real show-stoppers) and - voilá - they work accurately and error-free for me! No need for another VFP copy-instance to be run during development & testing. No more need for some hard-to-debug COM-Server.
Wow, I don't know why, but since I started to use Foxtools' GetClipDat() function instead of the Win API call GetClipboardData() within my test form's GetClipboard() method the big errors are all gone. I can copy & paste AND convert to HTML all from within a single VFP instance - as I always expected!
Foxtools.fll Clipboard Functions
Listing #1 below shows the clipboard related functions contained in Foxtools.fll - I've added some notes about bugs I found while checking them.
| Clipboard functions in FOXTOOLS.FLL |
*\\ ---------------------------------------------
lnFormatCount = CountClipF() && count all formats ;
currently available on the ;
clipboard
*\\ This FoxTools function is a clone of the WinAPI call CountClipboardFormats()
*// ---------------------------------------------
*\\ ---------------------------------------------
llOkay = CloseClip() && close windows clipboard
*\\ This FoxTools function is a clone of the WinAPI call CloseClipboard()
*// ---------------------------------------------
*\\ ---------------------------------------------
llOkay = EmptyClip() && Empties the Clipboard and ;
frees handles to data in ;
the Clipboard, then assigns ;
ownership of the Clipboard ;
to the current VFP session.
*\\ This FoxTools function is a clone of the WinAPI call EmptyClipboard()
*// ---------------------------------------------
*\\ ---------------------------------------------
nFormat = EnumClipFm(m.nFormat) && Enumerates the ;
formats found on the ;
Clipboard.
*\\ This FoxTools function is a clone of the WinAPI call EnumClipboardFormats()
*\\ Example EnumClipFm()
SET LIBRARY TO HOME() + "Foxtools.fll" ADDITIVE
IF OpenClip(_SCREEN.HWnd)
ACTIVATE SCREEN
CLEAR
*\\ Start with EnumClipFm(0) gets the first ;
format available.
nFormat = EnumClipFm(0)
DO WHILE m.nFormat != 0
IF BETWEEN(m.nFormat, 49152, 65535)
?? " | GetClipFmt(#" + ;
TRANSFORM(m.nFormat) + ") =" ,;
GetClipFmt(m.nFormat)
ELSE
?? " | GetClipFmt(#" + ;
TRANSFORM(m.nFormat) + ") =" ,;
"standard-format"
ENDIF
nFormat = EnumClipFm(m.nFormat)
ENDDO
= CloseClip()
ENDIF
*// ---------------------------------------------
*\\ ---------------------------------------------
cData = GetClipDat(m.nFormat) && Returns the ;
Clipboard data of the ;
specified format. BUG: Only good for returning character data - Fails with UNICODE completely!
Example: If there are are bytes lower than CHR(32) on the clipboard, GetClipDat() won't return them correctly (instead it truncates the rest)! In such a case you have to use the Win API call GetClipboardData() instead! But then you have to be aware of the buggy behaviour of the SYS(2600) functionality you have to use in that case!
*\\ This FoxTools function is a clone of the WinAPI call GetClipboardData()
*\\ Error-free working example of GetClipDat()
SET LIBRARY TO HOME() + "Foxtools.fll" ADDITIVE
IF OpenClip(_SCREEN.HWnd)
ACTIVATE SCREEN
CLEAR
*\\ Start with EnumClipFm(0) gets the first ;
format available.
nFormat = EnumClipFm(0)
DO WHILE m.nFormat != 0
IF m.nFormat = 1 && cf_Text
? GetClipDat(1)
ENDIF
IF m.nFormat = 49298 && Rich Text Format
? GetClipDat(49298)
ENDIF
nFormat = EnumClipFm(m.nFormat)
ENDDO
= CloseClip()
ENDIF
*// ---------------------------------------------
*\\ ---------------------------------------------
GetClipFmt(m.nFormat) && BUG: Returns the first 3 ;
letters of the format name;
only! URGS!
*\\ This FoxTools function is a clone of the WinAPI call GetClipboardFormatName()
*\\ Example: Use Win API call instead!
DECLARE INTEGER GetClipboardFormatName IN user32;
INTEGER format,;
STRING @lpszFormatName,;
INTEGER cchMaxCount
LOCAL lnLoop AS INTEGER,;
lcBuffer AS STRING ,;
lnResult AS INTEGER,;
lnBuffSz AS INTEGER
lnBuffSz = 255
SET ESCAPE ON
CLEAR
*\\ Registered clipboard formats are identified ;
by values in the range 0xC000 through 0xFFFF
FOR lnLoop = 49125 TO 65535
lcBuffer = REPLICATE(CHR(0), m.lnBuffSz)
lnResult = GetClipboardFormatName(m.lnLoop,;
@m.lcBuffer ,;
m.lnBuffSz)
IF m.lnResult > 0
?? " | ID#" + TRANSFORM(m.lnLoop)+ ;
" = " + LEFT(m.lcBuffer, m.lnResult)
ENDIF
NEXT
*// ---------------------------------------------
*\\ ---------------------------------------------
llOkay = IsClipFmt(m.nFormat)
*\\ This FoxTools function is a clone of the WinAPI call IsClipboardFormatAvailable()
*// ---------------------------------------------
*\\ ---------------------------------------------
llOkay = OpenClip(THISFORM.Hwnd)
*\\ This FoxTools function is a clone of the WinAPI call OpenClipboard()
*// ---------------------------------------------
*\\ ---------------------------------------------
lnFormatID = RegClipFmt(m.nFormat)
#IF .F. BUG: Appends additional (trash-)characters to the new format name passed in <cFormat>. Thus, creating always new/different registered clipboard formats from one and the same format name bloats the amount of registered formats unnecessarily! Well, okay, there are 16383 different registered formats possible (49152 through 65535), but who knows what will happen, if they all will be used one fine day??
#ENDIF
*\\ This FoxTools function is a clone of the WinAPI call RegisterClipboardFormat()
*\\ Example: Use Win API call instead!
DECLARE INTEGER RegisterClipboardFormat IN user32;
STRING lpszFormat
LOCAL lnFormat AS INTEGER ,;
lcFmtName AS STRING
CLEAR
*\\ Registering a new clipboard format
lcFmtName = "My Super Format"
lnFormat = RegisterClipboardFormat( ;
m.lcFmtName)
? "New format Id for '" + m.lcFmtName + ;
"' = " + TRANSFORM(m.lnFormat)
*// ---------------------------------------------
*\\ ---------------------------------------------
llOkay = SetClipDat(m.nFormat, m.cData)
*\\ This FoxTools function is a clone of the WinAPI call SetClipboardData()
*// --------------------------------------------- |
| Listing #1: FoxPro's Foxtools clipboard functions |
Those Foxtools.fll functions that are buggy can be replaced with the corresponding Win API calls pretty easily.
Accounting for VFP's Limited RTF Capabilities
We all know that the Windows clipboard is a shared resource. Thus, our tool never can be sure that all clipboard content stems from VFP. In other word: Before executing our "RTF to HTML conversion" we have to reassure that the RTF-formatted part of the Window clipboard was generated by Visual FoxPro not by another Windows application like Word or Excel. Otherwise we would have to implement a full blown RTF parser which is too much of a good thing (at least at the moment)!
BTW: We have to check if there is any text on the clipboard at all before starting our conversion!
Accounting for VFP's Syntax Colouring Errors
We all know that VFP has some syntax colour bugs . Thus, it sounds like a good idea to fix the outcome in the generated HTML colouring while creating it on the fly. Here are the bugs we are going to address:
- The NOTE Bug
- The Continuous Inline-Remark Bug
- The RTF BackColor Bug
- The <a href> Bug
The NOTE Bug
I told you about this error in part 2 (see VFP Bugs, Oddities and Workarounds there). The only thing we can do when getting hit by this one is to inform the user about it. We will sound some WAV-file indicating that the RTF content is corrupted. Maybe its a good idea to pop up a little hint dialogue as well.
The Continuous Inline-Remark Bug
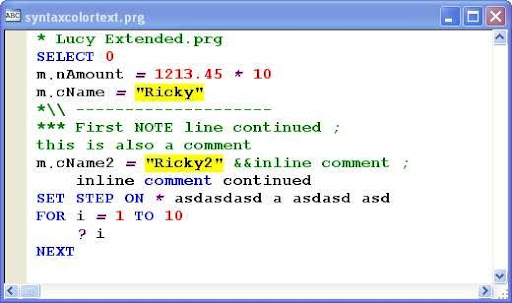
VFP resets syntax colouring at the end of an inline comment line. If we are using some inline comment like && comment text; at the end of a code line, the next code line is a comment, too! That line should be coloured with the same comment-colour like in the following sample lines:
* First remark line continued ;
this is a "well-behaved" VFP comment
cName2 = "Ricky2" &&inline comment ;
this is a Continuous Inline-Remark Bug line
What
really happens looks like shown below:
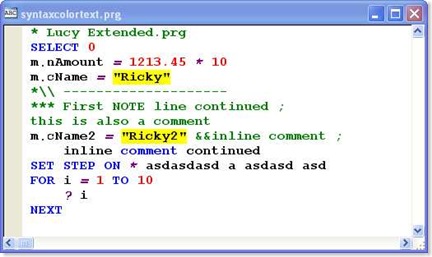
Figure #1: The Remark inline bug
The indented text on line#9 is treated like a regular code line by the color-engine (but it doesn't get executed by VFP's interpreter!). Thus, VFP's compiler/interpreter is doing it right, VFP's color-engine runs a bug!
BTW: There is another little oddity shown in figure #1 (on line #10). As you can see there, you are able to put a remark "*" after some key words that don't expect other code following behind (SET STEP ON in our case). VFP's compiler/interpreter treats the "* asdasdasd a asdasd asd" like an inline comment correctly! VFP's color-engine doesn't recognise that fact and paints the star (*) using the operators colour.
We won't take the last issue into account, because it is very uncommon!
Anyway, the continuation of an inline remark isn't! Thus, we will check for the occurrence of that issue in our RTF code before applying any colours to our transformed HTML outcome.
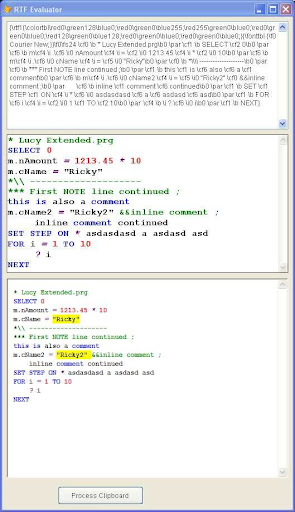
Another VFP oddity is: Although VFP's color-engine paints line #7 (shown in figure #1 above) right in the editor session, it won't transfer the (green) comment colour to the next line in the generated RTF clipboard output. Figure #2 below, which is a screen capture of my RTF Evaluator 0.9b, shows that quirk: line #7 of the RTF control shows no green comment colour!
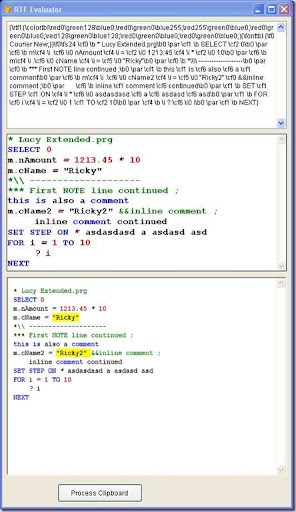
Figure #2: RTF Evaluator V0.9b (with HTML pane)
This interim RTF Evaluator version 0.9b has a third (lower) IE browser control that shows the generated (alpha-)HTML outcome. There still are some bugs but one can see what will be generated pretty soon :-) The RTF2HTML conversion still isn't well-coded - but hey, that's why we call it Alpha-Stuff :-)
| The latest version "09c" now uses Foxtools.fll functions for clipboard access. Thus, it can be run within the same VFP instance without any errors! Hurra!! |

Download RtfEval_09c.Zip here (version "c" has some improvements & bug-fixes) |
| Download #1: RtfEval_09c.Zip |
The RTF BackColor Bug
We talked about that bug in part 4 in detail. We've also talked about the way how to circumvent it. Now it is time to talk about what kind of HTML code we could use to colour our text's background the right way. Figure #2 above shows some black on yellow string colouring in the lower IE-browser control. As one can see in the "remark line bug" figure #1, black on yellow was the right way to colorize a string, but: because the back-colour information got lost on it's way down to the RTF representation, we have to reapply it manually while converting the code from RTF to HTML. How can we do that quite simply?
Let's get inspired by Google DOCS
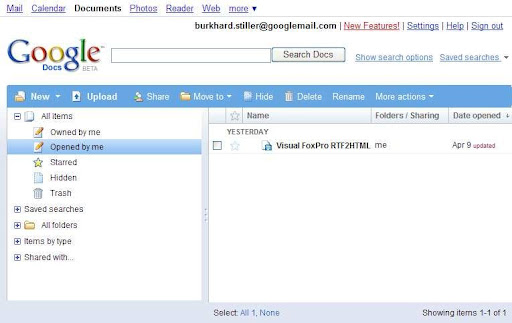
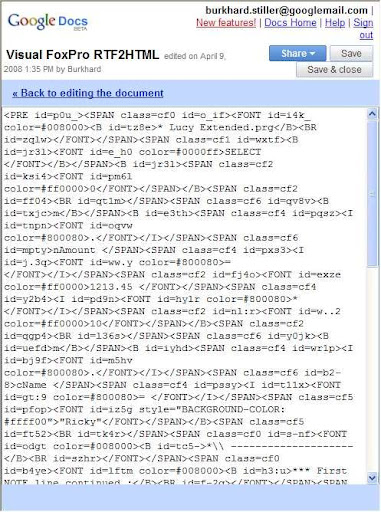
Figure #3 below shows a screen shot of my browser running Google's online/HTML-based document manager and word processor.
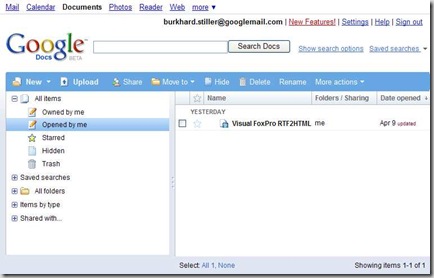
Figure #3: Google's HTML-based online word processor
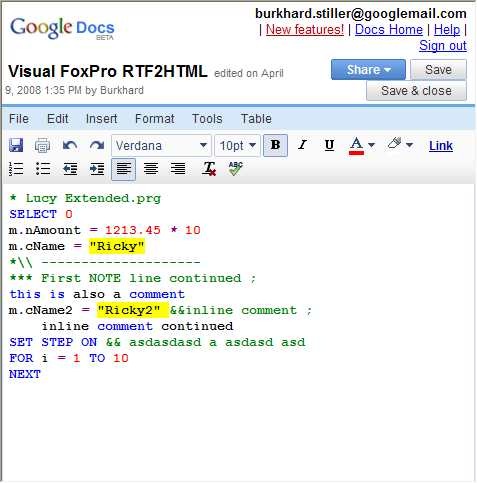
The good news with Google Docs is that one can edit any kind of text very easily using the built-in WYSIWYG editor like shown in figure#4 below...
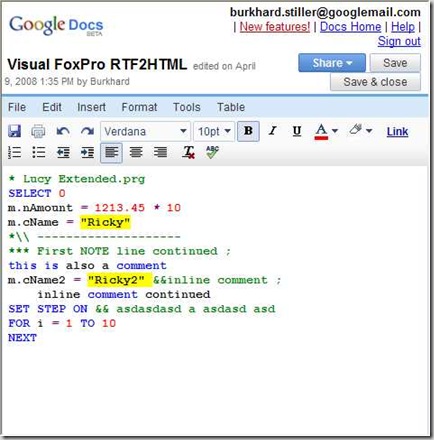
Figure #4: Editing VFP code online with Google Docs
... and then switch to the built-in plain HTML view to catch the idea how to easily format the same text using HTML tags like shown in figure #5 below:
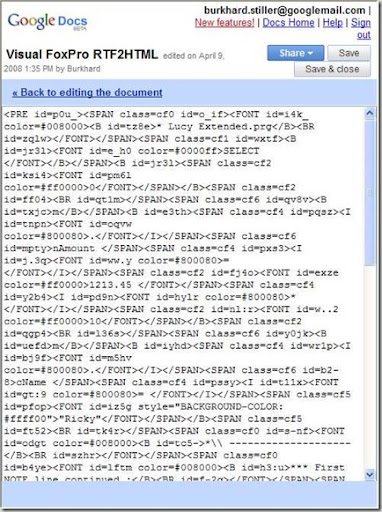
Figure #5: Getting the HTML tags from Google Docs
Well, he-he, okay, Google Docs is using a little bit more sophisticated ID-handling. We do not need that in our case - let's keep things simple instead!
The cool thing about Google Docs I wanted to show you is, that we are gifted with a lot of markup functionality when using Goggle's WYSIWYG-mode. In the end we can use the generated outcome directly instead of learning HTML tags from a book first! For example:
Apply some markup to a text interactively in WYSIWYG-mode, then switch to plain HTML display and copy the correct HTML tags to your code. That's the way I did it during development of the final version of my RTF2HTML converter. Table #1 below shows all HTML-tags I found interesting and useful in our context:
| HTML-Tag | Meaning |
| <pre> </pre> | Pre-formatted text. This keeps indentations and attributes! |
| <code> </code> | Logical block format: "this is source code" |
| <div> </div> | Block element |
| <span> </span> | Inline element |
| <blockquote> </blockquote> | Block citation (strict HTML/XHTML need another <p> ... </p> inside) |
| <br> | Line break |
| <p> </p> | Paragraph |
| <Font> </Font> | Font definition |
| face = "..." | Font-attribute declaring the font name |
| size = ... | Font-attribute declaring the font size |
| style = "color: #?????? ;background-color: #??????" | Font-attribute declaring the font's fore-and background colours (amongst others) |
| <nbsp> </nbsp> | No break |
| <address> </address> | Logical text attribute: can be used for copyrights and addresses |
| <a href="..."> | Link to another html URL |
Table #1: Useful HTML tags and attributes
With these HTML-Tags and attributes we can reach our source code colouring-aim easily! The only thing we have to keep in mind is that we have to reset any applied colouring at the end of it's scope in case it modifies the background colour! Figure #4 above demonstrates what I mean. On line #8 you can see the yellow background of the string "Ricky2" spanning over the string itself colouring the trailing space. This stems from the fact that VFP doesn't insert a colour-reset into the generated RTF clipboard text at the end of each ASCII-token. If you studied some of VFP's generated RTF output you surely have noticed that VFP inserts a new RTF color control word only when a new fore-colour has to be set. In other words: There is no such thing like a closing RTF colour-tag! We have to insert the appropriate HTML counterpart on or own! (Yes, another detour we have to take on our way down to a perfect solution!) HTML listing #2 below shows the complete LucyExtended program shown in figure #1. At the beginning of that listing I've added an HTML header and a body tag so you can copy&paste the whole thing into a file on your hard-drive to test-drive it within your local browser (if you like):
| HTML version of our LucyExtended.Prg |
| <html>
<head>
<title>Lucy Extended.Prg</title>
</head>
<body> <div style="font-family:Courier New; font-size:12pt"><nobr>
<FONT color=#38761d>* Lucy Extended.prg</FONT><br>
<FONT color=#0000ff>SELECT</FONT> <FONT color=#ff0000>0</FONT><br>
m.nAmount = <FONT color=#ff0000>1213.45</FONT> <FONT color=#9900ff>*</FONT> <FONT color=#ff0000>10</FONT><br>
m.cName = <FONT style="BACKGROUND-COLOR: #ffff00">"Ricky"</FONT><br>
<FONT color=#38761d>*\\ --------------------</FONT><br>
<FONT color=#38761d>*** First NOTE line continued ;</FONT><br>
<FONT color=#38761d>this is also a comment</FONT><br>
m.cName2 = <FONT style="BACKGROUND-COLOR: #ffff00">"Ricky2"</FONT> <FONT color=#38761d>&&inline comment ;</FONT><br>
<FONT color=#38761d>inline comment continued</FONT><br>
<FONT color=#0000ff>SET STEP ON</FONT> <FONT color=#9900ff>*</FONT> asdasdasd a asdasd asd<br>
<FONT color=#0000ff>FOR</FONT> i = <FONT color=#ff0000>1</FONT> <FONT color=#0000ff>TO</FONT> <FONT color=#ff0000>10</FONT><br>
? i<br>
<FONT color=#0000ff>NEXT</FONT>
</nobr></div> </body>
<html> |
| Listing #2: HTML version |
There are some things to mention here. Keep in mind that it is a good idea to keep your code always as encapsulated as possible (even if you're only dealing with some HTML fragments like we do here)! In our case the transformed code is wrapped inside the <div>...</div> block - and is completely self-describing (using no CSS-references for example). Thus our generated code block could be considered a well-formed, independent HTML fragment which can be inserted almost everywhere without causing trouble. This leads us to the next question: How can we additionally decorate our HTML output to blend in blogs and wikis even more smoothly? Before we will answer this question let's have a closer look at the last buggy VFP behaviour called
The <a href> Bug
As we can see clearly the http line isn't underlined completely (the final ".aspx" is missing in the link-expression)! This is caused by buggy interpretation of the URL-string. If we would remove the closing bracket ")" near the end of the URL, VFP's compiler/interpreter would get the complete expression.
| Engine.IsClipboardDirty() |
*\\ Check if workstation's clipboard is dirty
LOCAL llDirty AS Boolean ,;
lnClipboardSequenceNumber AS INTEGER
*\\
WITH THIS
*\\ Call Windows API;
http://msdn2.microsoft.com/en-us/library/ms649042(VS.85).aspx
lnClipboardSequenceNumber = ;
GetClipboardSequenceNumber()
IF NOT m.lnClipboardSequenceNumber = ;
.nClipboardSequenceNumber
m.llDirty = .T.
*\\ store actual sequence number
.nClipboardSequenceNumber = ;
m.lnClipboardSequenceNumber
ENDIF
ENDWITH
*//
RETURN m.llDirty |
| Listing #3: The HTTP / <a href> Bug |
For now we have to create a workaround to solve that kind of bugs. Alas, another detour on our way home :-)
HTML Code Generated Additionally
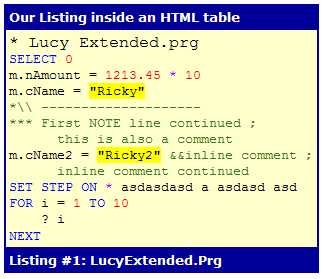
When we finish our RTF-transformation we end up with another program buffer holding our generated HTML code. We've discussed in the previous chapter that this generated code can be inserted almost everywhere. Thus, it is a good idea to create some kind of template-based HTML framework that is easy to configure yet flexible enough to generate such an outcome like shown in figure #6 below:
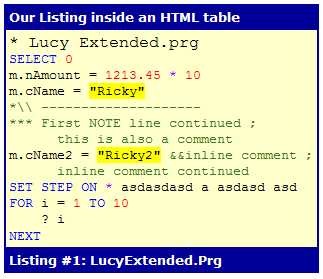
Figure #6: Some nicely formatted layout
Of course we could design such a HTML layout framework as complex as the hell - you're welcome to do so - but for now let's keep it pretty simple stupid :-) Here is what I wanted to have:
- Listing title
- Listing copyright
- Listing footer
- Listing body (of course)
You can put a special remark line into your code like this:
*<header>Our Listing inside an HTML table</header>
This line will be cut out from the test-stream during conversion and will be used as a table header (like shown in figure #6 above).
You can put a special remark line into your code like this:
*<footer>Listing #1 LucyExtended.Prg</footer>
This line will be cut out from the test-stream during conversion as well and will be used as a table footer (like also shown in figure #6 above).
You can put a third special remark line into your code like this:
*<copyright>(C) 2008 by Burkhard Stiller, Germany</copyright> This line also will be cut out from the test-stream during conversion and will be used as a
popup note (showing up when hovering with the mouse over a definable spot).
All the rest should be treated as source code and will belong to the listing body. There will be some internal configuration settings that will be be made selectable/adaptable through a separate configuration dialogue. The following table #2 still isn't complete. I'm going to extend it while implementing the final converter version.
| Configuration-Variable | Meaning |
| Add_Pre | Wraps body with <pre> </pre> |
| Add_Code | Wraps body with <code> </code> |
| Add_BlockQuote | Wraps body with <blockquote> </blockquote> |
| Add_Table | Wraps body inside a 3-line table |
| Add_Header | If add_table: adds a header line |
| Add_Footer | If add_table: adds a footer line |
| Add_Copyright | If add_table: adds a copyright |
| Overwrite_ColorScheme | If .T. : uses own syntax colours |
| Extended_ColorScheme | If .T. : adds new syntax areas (!) |
Table #2: Useful configuration settings
Where to Paste Our HTML
One thing we have to think about is what to do with our generated outcome. The simplest thing would be to stuff the generated HTML outcome back into VFP's _CLIPTEXT system variable. This would overwrite the entire windows clipboard content resetting it to plain ASCII text (see CF_TEXT constant with format-Id :=1). If you carefully read Microsoft's documentation about the Windows clipboard you should know by now that the "richest" format should be the first on the clipboard. In other words: There can be more than only one format on the clipboard (some of the more basic ones sometimes are added by Windows automatically!). Thus, there is no need to empty the clipboard before returning our generated HTML into it. We can add our own HTML-Clipboard format! Most of the Blogs out there can handle this. For all other applications we will provide an optional switch to change this behaviour.
Options, Extras and Extensions
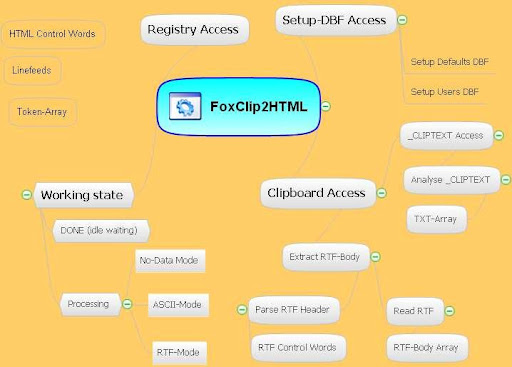
A good tool should be useful and easy to use but (also!) as modifiable and extendable as possible. Figure #7 shows a first draft (a mind map) of the final RTF2HTML converter.
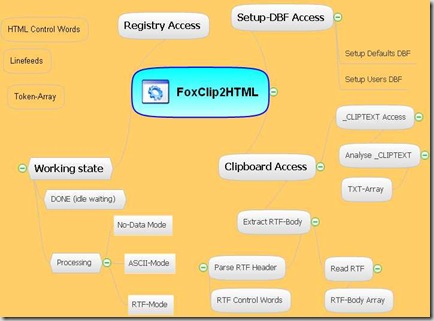
Figure #7: Some Mind map of our project
Okay, this chapter shouldn't get too long ATM. The first aim to reach is a bulletproof stable working converter that produces slim and "encapsulated" HTML output that reflects the original colouring 100%. When that target is reached one can think about some nice to have additional extras like the ones listed in table #3 below:
| Extension | Purpose |
| AutoBeautify | Automatically apply the VFP's beautify functionality before transmitting the code to the clipboard. We will apply some cool direct calls to VFP's FD3.FLL here! |
| AutoLineBreaks | Break code lines around a given column position. This would be very useful for pasting code samples into narrow blog columns. Line breaking should takes place at correct spots only (not in the middle of a word!) |
| AutoTxt2Rtf | If no RTF is on the clipboard but plain TXT is, then automatically create the appropriate RTF format on the clipboard first. |
| PrivateColors | Extend the default/registry-based VFP syntax colours with your own colour definitions |
| MultiTargets | Extend the private colour definitions:
The user cannot only store one additional colour scheme but as many named schemes as she likes. Thus, one could handle multiple blogs/home pages ASO. |
| CustomColors | Extend the private colour definitions:
Enables Write-back to Registry of the user-defined syntax colours. Thus one could change the available area colours to any possible hue (not only to that offered by VFP internally) |
| CustomAreas | Add NEW colour definitions (additional ones!) to create own/private syntax area definitions. For example to colorize global variables, properties, method names, ActiveX elements ASO. |
Table #3: Useful Enhancements
The User Interface (GUI)
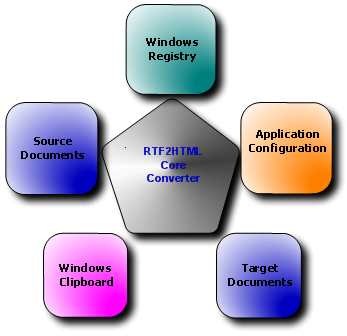
Last but not least we have to talk about the user interface. Well, most of the time our little helper will sit idle and invisible waiting in the background. Thus, the only primary user interface we need in our first version is a dialogue form through which we can setup and configure our service. Figure #8 below shows the main areas of our converter tool all of which will have some footprint in our GUI.
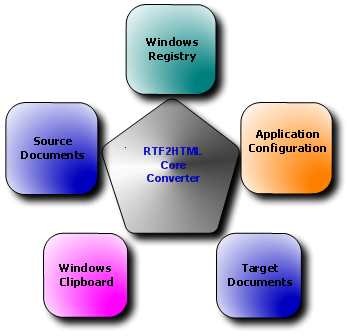
Figure #6: Converter Areas of Functionality
-
Application Configuration
There are a lot of optional application settings that should be made configurable by the user...
-
Windows Registry
Visual FoxPro's colour settings are stored inside a Windows registry hive. The name of that hive varies from VFP-version to version. Thus, it is a good idea to let the user choose the actual/correct name through a GUI dialogue.
-
Windows Clipboard
It would be definitely a good idea to let the user stuff more than one HTML fragment to the clipboard. Thus, we need some temporary buffer inside our converter application to hold those fragments. Through some appropriate GUI elements we will enable the user to select those parts she wants to transfer back to the clipboard
-
Documents
The biggest advantage would be if the user could choose between the different types of documents from which she wants to take the RTF code and to which she wants to transfer back the generated HTML outcome. Since now we've only talked about how to manipulate what's on the clipboard. Looking at the View Class Code button of VFP's Class Browser's should clarify what I mean.
Preview
In part 6 of this thread we will talk about the actual implementation of our RTF2HTML conversion tool and the ways you could enhance it if you want :-)












 I'm currently planning a new project called VFP Shell Extensions. Alas, it seems to grow steadily – the more feasibility studies and prove of concepts I do, the more challenges appear that must be solved/evaluated first! In other words, I need to know if such an effort would pay off in the end. One thing's fore sure: Even to satisfy my own sadomasochistic attitudes, I wouldn't go that far on my own;-) Thus, let me explain some backgrounds and what I've planned so far. I only would like to know from you, if you would be willing to pay for such an extension. Maybe I will show up a poll at the right side of my blog.